To safely install a FireAngel Mains 9V alarm through either hardwire or wireless with the RF Interlink Push Fit Base, please follow the below instructions.
Wiring should be installed by a qualified electrician in accordance with BS7671. Permanent connection to the fixed wiring of the building should be made in a suitable junction box and any alarm must not be exposed to dripping or splashing. Connect the alarm as late as possible in an installation and keep the dust cover over the alarm, particularly in new build, to avoid contamination. Remember to remove the dust cover before applying power.
Push Fit Mains 9V Hardwire Installation
Switch off electricity supply
Ensure a permanent connection to the house wiring is made in a suitable junction box
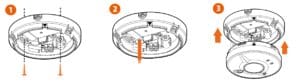
Using a screwdriver, gently open the 3 clips on the base to remove the base plate
Fit the base to ceiling using the screws provided, feed the wiring through the hole in the base plate or via YT2 trunking knock-outs at the side
Connect the wiring to the connector terminals
Ensure that the house wiring ‘Earth’ is only terminated in the terminal marked as indicated
Unwrap battery, insert battery into battery compartment (match ‘+’ to ‘+’)
Press and hold the test button for 5 seconds, the alarm will sound
IMPORTANT: Align arrows on the side of the alarm and the side of the base, gently push alarm onto base
Turn the electricity supply back on and check that the green LED is on
Press and hold the test button for 5 seconds, the alarm will sound
If desired, the alarm can be interconnected with up to 11 other smoke (SW1), heat (HW1) or carbon monoxide (CW1) alarms from the FireAngel range.
IMPORTANT: The circuit used to Power the alarm must be a 24 hour voltage circuit that cannot be turned off by a switch.
In accordance with BS 5839: Part 6, we recommend: For mains powered alarms, each with an integral standby supply, the mains electricity supply should take the form of either
a) an independent circuit at the dwelling’s main circuit board, in which case no other electrical equipment should be connected to this circuit (other than a dedicated monitoring device installed to indicate failure of the mains electricity supply to the alarms);
or b) a separately electrically protected, regularly used local lighting circuit
Check with local building and fire regulations for your property, to ensure compliance. Ensure dust cover is removed before operation.
The red LED on the front of the alarm should flash once every 32 seconds (approx.) to show that the alarm sensor is actively monitoring for smoke. When the test button is pressed, the alarm will flash once every 8 seconds for 8 minutes.
RF-BW installation and set up
Install the RF-BW docking base on the ceiling no closer than 300mm from the nearest light fitting (always refer to your Smoke/Heat/CO alarm manual for positioning and installation guidance)
Bring wires through either the YT2 trunking knockout on the side of the base or the knockout in the base itself and install the wires into the connector terminals marked L (live), Neutral (N) and Earth (E)
Install ALL bases that will be required in the system in their appropriate positions
IMPORTANT: The circuit used to power the alarm must be a constant 230V AC 50Hz voltage circuit that cannot be turned off by a switch
Learning in a new system
The system must be learnt in before the alarms are installed on the base.
Locate the push button on an installed RF-BW and press briefly using a small screwdriver
The amber LED will illuminate for 3 seconds to indicate that it is activated
The buzzer will also give an audible ‘chirp’ to show that it is working
Repeat this process on every remaining RF-BW required to be in the system – as each alarm is successfully learnt in, the amber LED will start to flash once every 3 seconds
Once all bases are learnt in, install Smoke/Heat/CO alarms onto each RF-BW as outlined in the owner’s manual
Turn on mains power
Ensure all Smoke/Heat/CO alarms in the system display a green power light and red operating light as per the Smoke/Heat/CO alarm manual
Ensure the amber LED on every RF-BW flashes once every three seconds.
Press the test button on each alarm in the system in turn and ensure 1) the alarm sounds and 2) it links with every other alarm in the system
Installation is now complete
NOTE: If all RF‑BW bases have been learnt in before 15 minutes has elapsed, pressing the test button on any installed Smoke/Heat/CO alarm will cause the learn in procedure to finish early. This will also test every alarm in the system. The amber LED on every RF‑BW will flash twice every 3 seconds for a period of 5 minutes after the learn in process has completed. If after a period of 15 minutes a unit has failed to learn in, it will sound a double beep for a period of 5 minutes.
For queries on Smoke/Heat/CO alarm related issues refer to the specific owner’s manual.
Deaf Awareness Week: Fire Safety for the Deaf and Hard of Hearing
Giving back: FireAngel’s IT Manager Derek’s time with the Sea Cadets
FireAngel stands with the NEA on fuel poverty action day
Electrical fire safety week: protect your customers and tenants
Got a burning question? Get in touch
If you can't find what your looking for on our blogs and looking for further guidance and advice, our UK-based Customer Support team are on hand all week from 8:30am until 5:30pm, they can answer any further queries you may have on our products, solutions or services.